Introduction
Learning how to use a compressor is easy if you know how it works. Most effects processors are fairly simple to use; plug in an equalizer (for example), twiddle the controls, and listen to the output, and you pretty much know what you’re doing, and all you need is some experience behind you.
Compressors don’t fall into this category. Plug them in and listen. What’s it doing? Unless someone has told you, then you probably won’t know.
Play with the controls. What do they do? Don’t know either.
What do the indicators mean? Difficult to tell.
It’s all a bit frustrating really…
Unfortunately, you need to be *told* what a compressor does.
Furthermore – even after you know what it does – someone needs to explain why the things that it does are considered useful.
You won’t figure it out for yourself.
Normally – for non-technical people – the explanations of what a compressor does, are so bewildering that they end up even more confused than they were before: “xDBs in, equals yDBs out, over zDb threshold, according to this graph” etc. etc.
What Does a Compressor Do – Compression Explained
Fortunately, I have a friend who explains it very well, and very succinctly: “What does a compressor do, Alan?”, “It makes the loud bits quieter. “I see… But surely if it just makes the loud bits quieter, can’t you then turn EVERYTHING right up, and make get everything really, REALLY loud?” “Exactly.” So there you go. Simple isn’t it?
A compressor just makes the loud bits quieter, allowing you to crank everything up to maximum volume. But under what situations would this be useful?
Increasing Overall Loudness
Firstly, there’s the obvious application of making your music/mp3s sound as loud as possible. This trend is starting to get a bit silly, and is beginning to prevent people from producing albums of good dynamic range.
Nevertheless, if you master a rock, pop, hip-hop, EDM or dance track with no compression at all, then the chances are it will sound pitifully quiet compared to the rest of the songs in your playlist. It will probably sound like it has been severely under-recorded. Not to mention, specific genres, especially the bass heavy and club genres mentioned, hip-hop, R&B, EDM, other sub-genres of dance are often over compressed and limited to give that big loud in your face sound.
Compression lets you get a much higher average level onto your mp3s (or CDs if you’re still making those) without affecting the music too much.
For Live Sound & Protecting Speakers
A very practical application of compression is in live PA setups such as a rock concert. There is a danger that very, very loud sounds will blow up the loudspeakers as well as risking serious hearing damage for those near the stage.
The solution is to put a compressor in place. This makes the loud bits – and in this case only the very loudest of the loud bits – quieter, so as to avoid damage to equipment (and people). Such hard compression of only the very top peaks of music, is called “limiting.
In the digital and plugin world, usually a compressor and a limiter are two different plugins. In terms of hardware there are some compressors that also have a limiting function as well as individual limiters and compressors. Limiting is often done over the whole song and is less common to be used on individual instruments and sounds.
For More Even Vocals
Another example of when compression is used is to compensate for the fact that many vocalists have poor microphone technique and control over their dynamic range. When they sing quietly, they sing *far* too quietly. When they sing loudly, they are *way* too loud. A compressor can reduce the “dynamic range” of the vocalist to a more manageable level, which is why a compressor is sometimes called a “Dynamics Processor”.
Sitting Vocals in The Mix
In fact, most vocals will benefit from compression in recording. Evening out the volume of the vocals helps the vocals as they say, “sit in the mix” which means there not overpowered by or overpowering the other instruments in the song.
In the days of analogue recording, the engineer would manually move the fader for the vocal track on the desk up and down depending on how loud or quiet the singer was singing each phrase. This would allow the compressor to work less hard and for the reduction effect of the compressor to less obvious resulting in a smoother and more natural vocal.
This is still a good technique (which we can discuss in another lesson) but these days most home studio guys, especially those recording themselves, rely even more on compression to even out the dynamic range of their voice.
Making Instruments More Even
Bass guitar is another instrument which can be hard to play consistently throughout a song. Any minor errors in the bass guitarists playing can leave “holes” in the song where the bass seems to disappear.
This works for all instruments in a song.
A compressor can help keep the performance at a consistent level. There are obviously many other instruments and sounds that could benefit from compression at some time. So, as you can see, there are many applications for a compressor. Basically, in any situation where sound volume levels are getting out of control, a compressor can be used to “tame” the extremes of volume and keep it within a reasonable range, entirely according to your needs.
Getting Started
Now that we know what a compressor does, we can start to learn how to use a compressor.
Since compressors have many different applications, the way that you use a compressor depends very much on what you are trying to achieve with it.
In this article, we will look at four main applications of a compressor which are all quite different. Most applications are just variations on these four different uses, so they should serve as a good starting point for most of the things you will want to do. The four main applications that we will look at, are:
1. Hard limiting – to prevent speakers or digital recordings from overload
2. Compressing an instrument or vocal
3. Adding “punch” to bass drums and bass guitars
4. Compressing a final mix
In addition, we will look at a specialized fifth example:
1. Side-chaining
But before we get into these, let’s look at the theory behind compressors and what the controls actually do. This is a little difficult to understand at first, so don’t worry if you haven’t “got it” the first time around. It will make more sense after you’ve experimented a bit with a real compressor in front of you. Note that not all compressors have all of these controls, and some compressors are very “minimalist” indeed. If you don’t have all these controls, then look at the compressors instruction manual to see what preset values the “missing” controls are set to.
What the Controls do
Firstly, in order to compress the volume range of something into a more “workable” volume range, you need to have in your mind an idea of what the lowest “normal” volume level is, and what the “loudest” volume level is, and have a mental idea of how “loud” you are prepared to let the loudest get.
Threshold
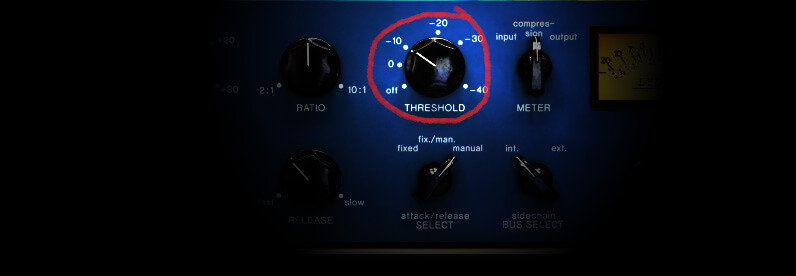
The “Threshold” control, sets the volume level at which the compressor starts to do its work. Below this volume level, the compressor will literally do absolutely nothing. So you basically set the “Threshold” control to the lowest volume level at which you want the compressor to start working. We will discuss in the examples how you actually make this setting. Naturally, if the “Threshold” control is set to maximum, the compressor won’t ever do anything at all because the level of the music is usually way below this level, and therefore remains totally unaffected.
Ratio
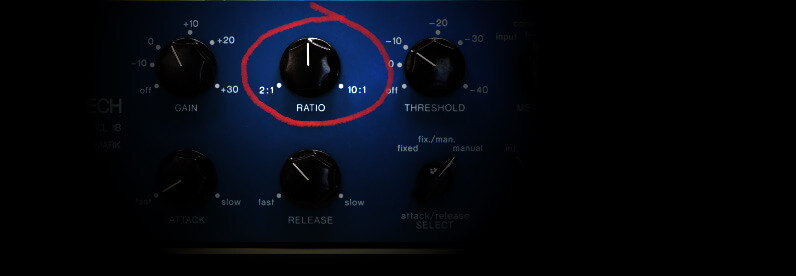
The “Ratio” control sets how “powerful” the compressor is. At its lowest setting (1:1), the compressor literally does nothing, and is effectively “switched off”. On the other hand, at its highest setting (normally marked 20:1 or even infinity-to-one), the compressor is 100% powerful – so powerful in fact that it TOTALLY PREVENTS the volume level getting even the *slightest* bit louder than the threshold level! Hard to believe? Try it and see. Set the compressor ratio at maximum, play some sound through the compressor and start turning the threshold level down until you hear the effect.
If you are playing solo drums through the compressor the effect is quite astounding. The only problem with doing this is that (naturally) the total volume gets so much quieter, because you are “constraining” it (compressing it) – so very much.
Make-Up Gain and Output
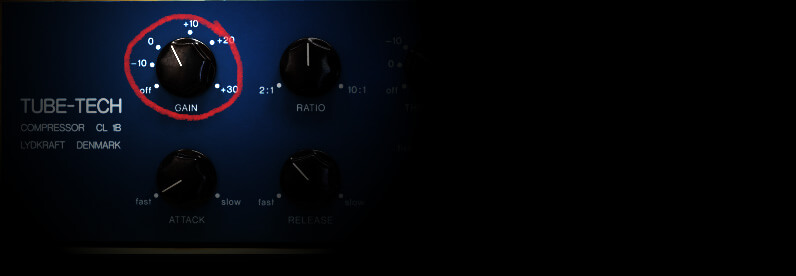
That’s why compressors and compressor plugins are almost always equipped with a powerful gain control marked “Output” or “Gain make-up” in order to boost the volume level back up to a reasonable level after it has been “squashed” down.
Every time you turn the “Threshold” down, you are “constraining” the sound more and more, and making it quieter, and so you almost always need to use the “Output” control to boost the level back up again. This is a bit irritating, so several compressors have a switch – normally marked something like “Auto gain make-up” or similar – to automatically boost the output as you turn the “Threshold” down. It’s not on every compressor, but it is a nice little feature to have, and saves you fiddling about with the “Output” control all the time.
Tweaking More…
For clarity in the following examples though, I have assumed you either don’t have this switch, or that it is turned off. So far so good. “Threshold”, “Ratio”, and “Output” are the main controls on an compressor, and “theoretically” give you everything you need. So what are the other controls for?
Soft vs Hard Knee Ratio
Well, sometimes – in the real world – things aren’t quite so simple. For example, you can have a vocal that is sometimes too quiet, sometimes too loud, and occasionally, way, way, way, way too loud. Wouldn’t it be nice if the compressor somehow had an automatic “Ratio” control? That’s why many compressors have a “soft-knee” or “over-easy” control. With the “soft-knee” control turned on, the compressor doesn’t simply and immediately “kick-in” at the level set by the “Threshold” control – it merely “starts” to work. As the level gets louder and louder, it reaches a level where it is finally reaching the “power” of compression that is set by the “Ratio” control.
So if you wanted to control a vocal that was wildy out-of-control in terms of levels, you could switch on the “soft-knee” control, set a “Ratio” much higher than normal, and set the “Threshold” control to the quietest “acceptable” vocal sound level.
When the vocal exceeds this level with the “Soft-knee” control switched on, the compressor starts to compress at fairly moderate levels. If however, the vocal gets wildly out of control and attempts to get *seriously* loud, then the compressor starts working much harder to pull it back to sensible levels. It’s a bit like having an automatic “Ratio” control, with the maximum compression “power” controlled by the setting of the “Ratio” knob on the front panel.
Attack
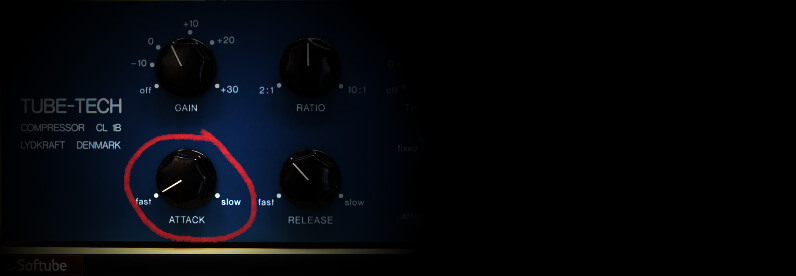
Then there are the “Attack” and “Release” controls. So what do these do? If you’ve followed this explanation so far, you’ll realize that a compressor is a bit like having a smart guy hanging onto a volume control and adjusting it by hand according to the music. But how quickly can this “person” respond?
Well, the “Attack” control, adjusts how quickly this “person” is, at turning down the volume when things get too loud. The “Release” control is how quickly that same “person” can turn the volume back up again when things have calmed down.
Why Do You Need It?
But why would you want to adjust this? Surely you would want it to be instantaneous? (after all, it *is* supposed to by an automatic system…) It turns out that in practice, in many situations, you don’t want the volume to be “instantly” cranked down the moment things get too loud. Under certain conditions you can really *hear* the volume being pulled down, and this is very undesirable. Instead, it *sometimes* sounds better if the “person” is a bit sloppy and slow at yanking the volume down. The “Attack” control affects this sloppiness.
Release
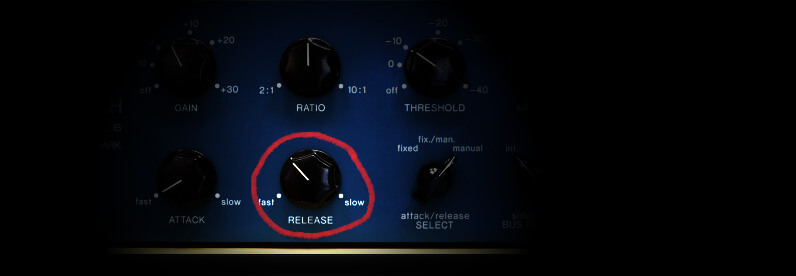
What about the “Release” control? Well, in a similar way, if the compressor is too fast at turning the volume control back up again, you can hear it working (the audible effect is known as “pumping”). It just sounds “artificial”. So the “Release” control adjusts the speed at which the compressor “recovers” after yanking down the volume. The exact speed which sounds “correct” depends on the music, so that’s why you can adjust it by hand. The examples following in a moment give some suggested settings, but by all means experiment in order to find the most “natural” sounding setting.
Peak/RMS
And that leads us to another control. It is a switch, and it is sometimes marked “Automatic” and sometimes marked “Peak/RMS”. So what does this switch do?
Well, as I mentioned before, the “Attack” and “Release” settings really depend on the music you are using the compressor on. But music continually changes.
What the “Automatic” or “Peak/RMS” switch does, is to switch on an automatic setting that attempts to “listen” to the music and continually set the correct “Attack” and “Release” settings for you.
Of course it doesn’t always do the best job, and that is why you also have manual control if you want it. It is important to realize that with this switch turned on, the “Attack” and “Release” controls are disabled and will do nothing.
Some compressors (unfortunately) don’t have “Attack” and “Release” controls at all, and are either set to preset values, or permanently set to RMS (automatic). Some of these are very popular for tracking vocals though such as the LA-2a because they are so quick and simple to use. It’s best to use the this type in a more subtle way since you can’t undo compression if it’s been recorded that way to begin with.
Bypass
There is also an IN/OUT switch (often marked BYPASS). This is essential. It is there so you can switch the compressing action on and off and thus hear the difference your changes have made. To make best use of this switch, you need to set the “Output” control such that the sound appears to be at roughly the same level irrespective of whether the compressor is switched IN or OUT – this allows you to easilly make comparisons by listening.
Link
The final control on most stereo or two-channel hardware compressors is called “Link”. What is this for? Whenever you adjust the volume control on a stereo mix, you always expect both left and right volume levels to change at the same time don’t you? (otherwise the mix would wander off to one side or the other). That’s what the “Link” control is for. It makes sure that both left and right hand volumes always change in time with each other, so the mix stays “in the middle”.
As an added bonus, the “Link” control *usually* (although, not always) disables one set of compressor controls on a two-channel unit, and takes all of its settings from just one set of controls. This is because on a stereo signal you normally want *exactly* the same settings on both sides – as well as keeping the volume levels equal. This is not the case on all compressors though, so it is important that you check your manual to find out whether you need to set the controls on both channels to be the same, or whether you only need to use one set of controls (the other ones being disabled).
On some compressors, even if one set of controls is disabled, the “Output” controls for each side may be independent (don’t ask me why – it does seem a bit silly) – again, you *must* check the manual, as it is not always easy to tell simply by playing with the settings and listening.
Now You Know What All The Controls Do
That completes our “tour” of the controls. I hope you understood it. Read it a couple of more times if you don’t, and if you’re still feeling lost, perhaps it might come to you after you’ve tried these examples.
Examples & How to Use The Controls
So: Now onto the examples…
Example 1: Hard Limiting
The problem: You are doing a live gig or an important digital recording. You want to leave the music completely untouched, but what you don’t want, is totally unexpected loud peaks causing damage or distortion.
The solution: You want to stop TOTALLY any music or sound exceeding your expected maximum level. This is usually an emergency situation in mixing, although very common in mastering. This is also quite simple to do with a compressor or if you’re mixing in the box (on the computer), a limiter plugin is better.
How to Limit On a Compressor (Without a Dedicated Limiter)
To do this on a compressor, Set the “Attack” and “Release” controls to their fastest – after all, it will only “kick-in” during cases of emergency, and you want it to respond immediately (to prevent distortion), and you also want it to recover immediately (so no-one notices anything happened).
Make sure that any “Automatic” or “Peak/RMS” switch is turned off – so that the “Attack” and “Release” controls actually work and are not in automatic mode. The “over-easy” or “soft-knee” switch (if present) should be turned off too. Then set the “Threshold” control to maximum (probably marked +10Db or +20Db, but on some digital plugins it may be marked as zero). This will prevent the compressor doing anything just yet. Then set the “Ratio” control to maximum (normally marked 20:1 or even infinity-to-one). You won’t hear anything happening just yet, because the “Threshold” control is set to maximum – effectively bypassing the unit.
Adjusting
Now, play the LOUDEST MUSIC SIGNAL YOU EVER EXPECT TO HEAR through the compressor, and look at the levels. Now, slowly turn down the “Threshold” control, carefully listening and looking at the levels. The moment you even *start* to hear a decrease in volume or see it on the meters then stop, and back off a tiny bit. You have found your optimum settings. Just to check, try playing some excessively loud music through the compressor. You will find that it refuses to exceed the maximum level you have set, no matter how loud the input! Needless to say, if you get a bit silly and try to blast the compressor with INCREDIBLY loud music, you may indeed hear the compressor start to distort (it still won’t exceed that maximum level though!). But this is just unrealistic. You are setting it up to handle only the most unusual, unexpected and extreme cases, which will be well below the level of distortion.
Example 2: Compression of an Instrument or Vocal
The problem: You are working with a fairly good vocalist. Normally when they sing loudly everything is fine – but every now and again they sing their little heart out so much that the recording either distorts, or is simply just way too loud. Unfortunately the vocalist is so unpredictable that when this happens you don’t have time to adjust the recording levels because it happens almost at random, and is difficult to predict. The solution: An ideal application for a compressor!
Getting Started
Start with a good recording level for normal recording, and with a fast “Attack” and a moderately slow “Release” on the compressor (ensuring these controls are on a “manual” setting). Also switch ON the “Over-easy” or “Soft-knee” button (if the compressor has one). As before, begin with both the “Threshold” and “Ratio” at maximum. Whilst the vocalist is singing at a fairly QUIET to moderate level, slowly turn down the “Threshold” control until either your ears or the meters detect the slightest faint drop in level. If your compressor has a “Gain reduction” meter it should *just* begin to indicate a change. Turn up the “Output” control until the quiet part is at a good level for you.
Adjusting
Now go to the LOUDEST part of the song and get the vocalist to sing (or play back a recording). With the ratio at maximum, you should now find that – ironically – the sound is far too quiet! Simply turn the ratio control down until the level is just about as loud as seems reasonable. The “Gain reduction” meter – if you have one – will probably be lighting up lots of pretty lamps at this point (unless it is just a boring VU Meter)
As a final pass on this example, you might want to get the artist to perform the song once through (or playback a “take” if you are compressing on playback), and at this point you might want to play with the “Attack” or “Release” settings to get the most “natural” sound. Be careful if choosing an slow “Attack” though, as it might allow the compressor to “overshoot” and exceed the levels which you so carefully set previously.
Helping to Prevent Clipping When Recording
You often hear home studio guys recommend using a compressor when tracking to prevent clipping. In reality, you can just record with enough headroom (record at a lower volume and leave enough volume for the loud peaks) so that your vocals don’t clip/distort. However, since compression can even out the dynamics of a vocal, that often makes performing and listening to compression when tracking a vocal useful.
Example 3: Adding “Punch” to a Sound (normally bass instruments like bass guitar or bass drum)
The problem: The artist is performing a fairly rhythmic pattern, but somehow they don’t seem to be “punching” through the mix, even though their sound is basically quite good. Every time they play a riff you know you really want to “feel” the “impact” – but it is simply not there. The solution: Although compressors are normally associated with *reducing* peak levels, did you know that they are capable of actually GENERATING amazing peaks?
This technique generally only works with “percussive” sounding instruments like drums, guitar (including bass), and spiky keyboard sounds like “clavinet”, that are playing a rhythmically “pulsating” part. The technique relies on the fact that the “Attack” control can be used to make the compressor respond in a sloppy way – thereby allowing loud signals to “overshoot” and generate peaks that weren’t even there in the first place!
Getting Started
To do this, start with a moderately slow release, a SLOW attack, and with the ratio and threshold at maximum. The “Soft-knee” or “Over-easy” control (if present) should be OFF. Play back the quietest part of the performance, and as before, turn down the “Threshold” gradually. You should find a setting where although the instrument is starting to get a bit quieter, it is starting to have more “punch” to it. Use the “Output” control to restore the level to a good volume. Now go to the loudest part of the song. You will find at these settings that the instrument is – surprisingly – too quiet. Turn down the ratio until the sound is loud enough.
Adjusting
Now check out the quiet part of the song again. You might now find that it is not as punchy anymore, and you might have to turn down the “Threshold” some more (and of course boost the “Output” to compensate). Finally, rehearse the part (or playback), and adjust the “Attack” to give you the “punchiness” you need overall. The “Release” control is quite critical in this scenario too. If you have it set too fast, you can hear the compressor “breathing” or “pumping” (you’ll know what I mean when you hear it!). On the other hand, if you set “Release” too slow, then you will start to lose the “punchiness” – it is a tricky balance.
Example 4: Compressing a Final Mix
Ooooh! This is the trickiest one of the bunch! You will probably have one of two problems. Either (a) the mix overall doesn’t sound “punchy” enough – which requires slightly different settings to the previous example, OR – (B) you have the more common problem – you simply can’t get your mix to sound “loud” enough compared to other recordings that you have in your collection.
The problem (a): The mix overall doesn’t sound “punchy” enough
The solution (a): If your mix doesn’t sound punchy enough you have to start with some “preset” settings on your compressor as follows:
Getting Started
Start with the “Automatic” or “Peak/RMS” switch turned ON (RMS setting). Music is a complex thing, and a “final mix” even more so. The “Automatic” or “RMS” setting will literally “listen” to your music and try to find the “ideal” settings for both the “Attack” and “Release” controls and disable them.
If your compressor doesn’t have an “Automatic” or “RMS” setting, then set both the “Attack” and “Release” settings to medium. In both cases we will end up adjusting them manually later so don’t worry too much.
Set (as before), the “Threshold” setting to maximum (which “bypasses” the compressor), but this time pre-set the “Ratio” control to about 3:1 or thereabouts.
Adjusting
Now, whilst playing the mix gradually turn down the “Threshold” level until you start to get a more punchy sound. You will (as always) have to turn up the output to compensate. When you can hear the compressor making a difference, try experimenting with the “Attack” and “Release” settings. If you previously set “RMS” or “Automatic” ON, then try to match both “Attack” and “Release” to the same sound as “Automatic” and use that as your starting point. The slower the “Attack” the longer the overshoot. Sometimes a short attack will sound good (making quick transients), other times, a slower attack will sound more appropriate.
I should mention, it’s a good idea to go around ALL the controls in turn, making slight changes until you believe that you have the best settings on all of them. Another good idea is to use the IN/OUT button (or enable/disable button if you’re using a compressor software plugin) to compare results with the original – using the “Output” control to match the sound level between the IN and OUT settings, so they are at the same volume – this greatly helps make a good comparison.
The problem (B): You can’t get your mix to sound “loud” enough compared to other recordings
The solution (B): You really need TWO sorts of compression here. Firstly, you need “limiting” set up as per example (1) previously.
Getting Started
Turn down the “Threshold” until you can start to hear the limiter making an unpleasant difference to the mix. Then turn it back up a bit, and try to find the position where you have the best balance between cutting down the peaks, and making an undesirable change to the music. In most cases it should be possible to apply quite a lot of limiting without any significant difference to the sound of the track.
Now that you have trimmed off the peaks, you can crank up the “Output” to a much more respectable level. This is one of the processes often done in mastering for mp3s and CDs. But you might want your song to sound louder still. If that’s the case, then apply another compressor BEFORE the limiter and just try some conventional compression as in solution (B) above (but probably with a faster attack).
Adjusting
Many mastering compressors have a compressor AND a limiter combined in one unit for this very purpose. As an alternative approach, set quite a fierce compression (5:1 or more), and switch on the “over-easy” or “soft-knee” button, and with fast attack. Start (as always) with the “Threshold” high, and slowly turn it down until you achieve the balance between a good amount of compression, and best sound quality. Adjust the “Release” control to help minimise how much you can “hear” the compressor working. The speed of “Release” setting is different depending on the speed and type of music – let your ears judge it. That concludes our four main examples.
Advanced Use: Side-Chaining
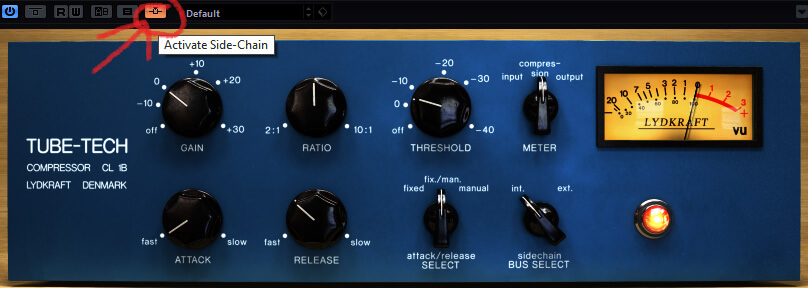
Some hardware analog compressors have a “Side-chain” socket on the back. Most DAWs also offer Sidechaining to compressor plugins. How it’s setup and routed will vary a little from DAW to DAW. I’ll probably do an article on that at some point.
So what’s it for? The compressor works by feeding the sound through the compressor itself, but also by feeding the sound to the compressor “control system”. The control system “listens” to the sound and controls the compressor’s reduction threshold.
Whatever you send to the side-chain won’t be heard through the output of the compressor or the listener. Think of it like a set of instructions. When you hear this sound, reduce the volume. The listener doesn’t actually hear what is set to the compressor. It’s just telling the compressor to reduce the volume when you hear peaks in this sound, even though the listener never hears the input of the side-chain. What we hear is the reduction effect only.
The release time knob controls the duration/length of the reduction. The attack knob controls how quickly to do it for.
Example
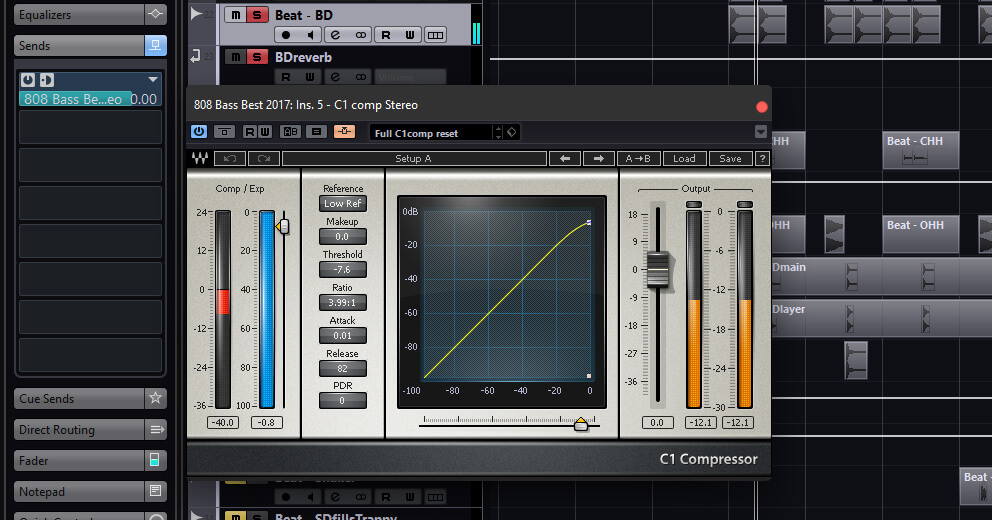
For example. If the attack knob is set to 0 ms and the release knob is set to 50 ms and the compressor is set to side-chain, any peaks through the side-chain input become an instruction to the compressor which is saying to the compressor…. “when you hear a peak through the side-chain input, instantly (in this example the attack is set to 0 ms, which means instant. – 2ms would mean after 2 milliseconds and it has a fade in from 0 to 2ms and so on) reduce the volume of whatever is presently routed through the compressors input for a duration of 50 ms.
When is this used?
In bass heavy genres such as EDM, Hip-hop, R&B, Pop and so on, it is very common to side-chain the kick drum to bass. Doing this will reduce the bass at the time of the kick drum. You set the attack almost as fast as possible without hearing click sounds coming through the sound being side-chained. You can often just get away with an attack of 0, or 5ms-10ms. Then you set the release to about the duration of the kick maybe 50ms or so, so that you hear the bass dropping when the kick hits without a gap of silence before it starts to rise back up again.
Since kick drums and sub-bass in bass heavy genres often occupy similar frequencies, this reduces the build up and overlap, allow both being able to raise the kick and bass higher before distortion/clipping occurs in the song but also letting the kick drum punch through the mix more, making it appear louder and more punchy.
You Also Hear This On The Radio When Radio Announcers Speak. So You Can Do the Same For Podcasting
On the radio, most stations send the announcer mics through to a side-chain compressor on each music channel. What this does is automatically turn down the music when the announcer is speaking so that you can hear them over the music. Pay attention the next time you hear a radio announcer speak over a song. Unless they manually turn the fader down on the desk first, you will hear the song quickly reduce in volume when they speak but raise slightly in between their pauses and when they finish speaking.
This is something you can do for podcasts to. To do it yourself you just feed the sound of your voice into the side-chain. In that way you can create a system that automatically fades down music when you speak, and fades it back up when you stop speaking. You have full control over the fade in/out rates using the “Attack” and “Release” controls.
Creative Uses of Side-Chaining
Vocal effects
You could feed the reverb returns from your lead vocal reverb through the compressor, but plug the dry vocal into the side-chain. That gives you a system where the reverb fades down when the vocalist sings, giving quite a “dry” sound, but returns to a strong “wet” reverb inbetween words and phrases in the song. It keeps the reverb from messing up the vocal in the parts when the words get busy. Such a technique is also useful for controlling the level of repeat “echo” effects at the end of phrases.
Pumping music effect
The best example of this effect is probably the song “Call on Me”
Notice how all of the music and even the vocal is side-chained to the kick to create an interesting effect. You hear this on some EDM on synth sounds to create more of a pumping type of effect.
De-Essing
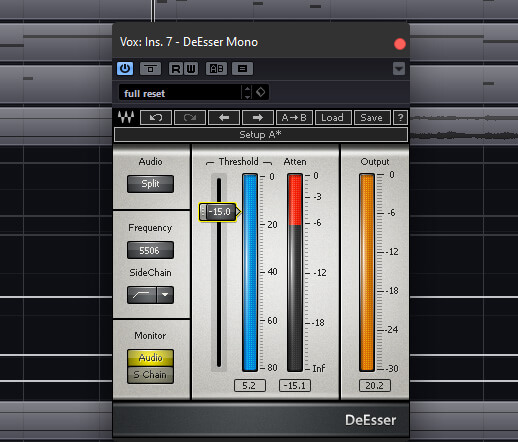
You have a vocal, but sounds such as the letters “S” and “T” are sounding really harsh, and burst through the mix too much. An extremely common problem. You don’t want to equalize them out of the vocal sound, because the vocal sound is actually quite nice apart from those explosive “S” and “T” sounds. This is where De-Essing comes in. If you’re mixing on the computer it’s as simple as inserting a de-esser plugin, selecting a frequency, often between 3-6k (sometimes higher), set the threshold and the plugin will try to detect bursts in this frequency range only and reduce them, thereby turning down the S and T sounds when they occur. Pretty cool right.
Aside from De-Esser plugins, there are also hardware De-Esser units. These work pretty much the same way as the plugin. If you need a hardware De-Esser, this is going to be your best and easiest option.
Make Your Own Hardware De-Esser
If though, for some reason, you’re doing live sound on an analogue board without a De-Esser rack or you’re in an analogue studio and you don’t have a De-Esser rack you can make your own De-Esser out of an EQ rack and a Compressor rack that has a side-chain input. You’ll probably never have to do this but hey, it’s handy to know and a fun experiment if you want to try it.
Using Side-Chaining to Create a De-Esser
Remember that the side-chain is a system that lets you insert something – a sound source or even a sound source that runs through another piece of hardware (or plugin) – like a graphic equalizer for example – immediately before the compressors control system. Note this is NOT in the main audio path and doesn’t affect the sound as such – just the way the compressor responds. This system lets you over-emphasise a certain frequency that you want the compressor to listen out for.
Remember the problem from earlier: You have a vocal, but sounds such as the letters “S” and “T” are sounding to loud. Let’s reduce them!
How to Do it
The solution: Using fast “Attack” and quite fast “Release”, set the compressor at about 3:1 and then place an equaliser into the side-chain. Suck out all bottom end, and middle, and apply a boost at around 3 to 6KHz. You will find that adjusting the “Threshold” will control how powerful the “S” and “T” sounds can get. Overdo it and the vocal can sound very strange. Set it so that it gets the “S” and “T” sounds just how you like them.
You Don’t Need More Than One Hardware Compressor To Do This
Note: It is understandable to think that you might need two hardware compressors on a vocal – one to perform de-essing, followed by another one doing “normal” compression. This is true when mixing on the computer in which ideally you’d use a De-Esser plugin before the compressor plugin. If you’re using hardware though, you can do this all with just one compressor. One compressor can do the two jobs at the same time!
Simply compress the vocal as normal. Then insert an equalizer into the side chain, and apply a small boost around the sibilant region (around 3KHz-6KHz). This will cause the compressor to over-react on sibilant sounds, thereby de-essing at the same time as compressing.
Use the EQ BOOST to control how much sibilant sounds are CUT. It is VERY, VERY IMPORTANT not to overdo de-essing. If you do, the singer will sound like they have a lisp. Or should that be lithp? 🙂 In any case, once you’ve screwed it up by overdoing it during recording, then there is little you can do to rescue it later – so go easy on it! (you can always de-ess some more during mixing if required).
You Don’t Need More Than One Hardware Compressor To Do This
It’s important to understand that the equalizer you choose to place in the side-chain does NOT affect the frequency response of the sound going THROUGH the compressor, just what the compressor internally LISTENS to. It therefore effects how the overall volume responds to changes in volume at certain frequencies. This is known as “Frequency SENSITIVE compression”. It is also possible to purchase more complex compressors that actually DO affect the frequency response in different bands, and this is known as “Frequency SELECTIVE” compression – there is a big difference between the two, although the names are similar, and even professionals get the two terms mixed up sometimes.
Using Presets
There is no such thing as a compressor setting that will work for every source or every type of source because all sources are different.
A setting that might work for one vocalist in one song where they are singing lots of long notes won’t necessarily work for the same singer on another song when they are singing shorter faster notes. The best settings for shorter faster notes are short release times. That way the compressor has time to come back up again to work properly for the next note. The best settings for longer notes are long release times. That way the compressor will hold the note for longer rather than only compressing the start of the note. Fast attack times can grab notes faster but can sound less natural and you will loose the attack and transient of each note if you make it too fast.
Useful as a Starting Point
So any ‘preset’ you might find or have, that you use without tweaking is wrong. That’s why you need to take the time to learn what each function does. It’s ok to use presets as a starting point but you’re going to need to tweak them.
In saying that, I can give you some presets of some averages as a starting point but use your ears and adjust them accordingly. This is purely for a loose guide.
Threshold
Generally speaking, you want to adjust the threshold so that you’re getting around 5-10db of reduction, however, the more even the source sound is, the less you need to compress, therefore, the less reduction you will need. For example, a limited EDM kick drum might need no compression since it’s exactly the same every time. So the threshold isn’t worth mentioning for any presets below.
Some Presets (Just a Guide Only)
Vocals – sung
Ratio 4:1-5:1, 5-10ms attack, 100-250 ms release
Vocals – rapping
Ratio 4:1-5:1 5-10ms attack, 50-100 ms release
Synth bass & sub bass
Ratio 4:1-5:1, 0-10ms attack, 40-200ms release
Rock Bass
Ratio 4:1-8:1, 5-15ms attack, 40-250 ms release
Most synths & Piano
Ratio 4:1, 5-20ms attack, 40-250 ms release
Distorted guitar power-chords
Ratio 5:1-8:1, 5-15ms attack, 40-250 ms release
Master bus or drum buss – subtle limiting
Ratio 2:1, 10ms attack, 50ms release
Summary
In Summary, knowing how to use a compressor takes time and practice. It’s not something so easy to learn from an article alone. The more you learn to use them, the more you can predict the behavior of the compressor based on it’s parameters. At least now, you should hopefully have a better understanding of how compression works and what the controls do.
In all of the above examples, the settings and approaches suggested are merely a guide. Your best teacher of compression is your own ears, and the compressors that you own. When you find a setting that really works on a certain instrument, write it down – and make your own preset. It might save you some time later when you next record that same instrument. You need to work with your compressor for a long time, and develop a good working relationship with it, until you can really trust what it is up to. At that point, you can rely completely on your ears rather than presets and typical settings.
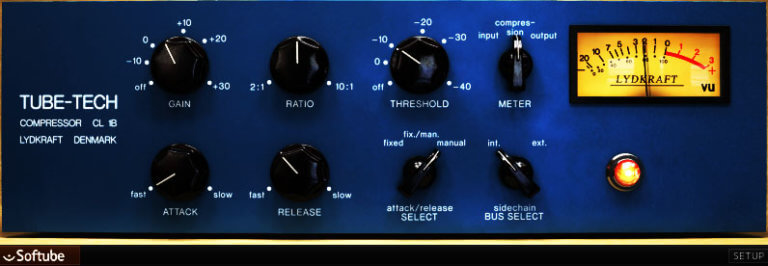
Different models of hardware compressors and plugins sounds different. That’s why people talk with great affection about certain old valve compressors, or perhaps a particular model of DBX compressor that they love.
Lots of engineers love the LA-2 compressor because it’s so simple to use. Hip-hop and R&B guys the Tube-Tech CLB-1 compressor. Both of those are opto-compressors. Opto-compressors are often a little more natural sounding on vocals. FET compressors give more of that rock style punch and often act a little faster. In general, hardware compressors can sound pretty different to each other and since so many are now emulated in software plugins, so can different compressor plugins.
Remember
As with all compressors, settings vary a little between equipment and plugins. A setting that sounds great on one compressor, might sound terrible on another. This applies to software plugins too, which is surprising, as one would expect the maths and figures to be identical in each one but that is often not the case.
Personal Preference
The fact that people have a personal preference for different types of compressed sound, means that there will always be a market for compressors from different manufacturers as well as plugin models of those. There will always be the “classic” compressors that almost everyone likes, and there will also be a number of obscure quirky units and plugins that only appeal to a select few.
You Need to Hear it!
Compression is an extremely difficult thing to describe in writing, and you really need to hear compression – in all its different forms – to get an understanding of how it can help you. Never apply compression to something simply because other people do. Apply it because you KNOW that you really NEED it and that you UNDERSTAND exactly what it is DOING to the sound.
Be Safe
If in doubt, when recording and tracking compress too little rather than too much (it is very difficult – indeed, often impossible – to undo bad compression later), and remember that too little compression during recording can always be made up for when mixing later with a software compressor.
Non-Destructive Compression
In fact, UAD plugins are pretty cool since they are DSP so they have no latency like software plugins but you can choose to record with the compression or just hear the compression but record the un-compressed signal. That’s a great tip and makes it impossible to mess up during recording.
Practice
As always, practice makes perfect, and I hope that this article has gone some way towards demystifying the process for you.
This article was originally written by Xar at the Serious Sounds Network http://serious-sounds.net/, a sound engineering and music production forum that has now been merged over to Current Sound. This article has been updated and modified by Tom Watson at Current Sound – Los Angeles Recording Studio, to bring it up to date with modern digital recording.

Subscribe to the newsletter at the bottom of this page to be informed of more free sound engineering lessons.
If you found this article interesting, please click or more of one of the social share icons below to share it.
